I have remade my characters at least 30 times now trying to find a mix I like. I am a big fan of the decks because they're a good way to learn how the point system works. I have of course ran into some issues and yanked my hair out more than a few times. WARNING! There are spoilers. If you don't like it leave. This blog will mostly have quest information. I do however expect any players coming here to be able to read their maps. I will always tell you to look at the damn map.
July 31, 2012
The Secret World (TSW) Egypt: Old Gods, New Tricks
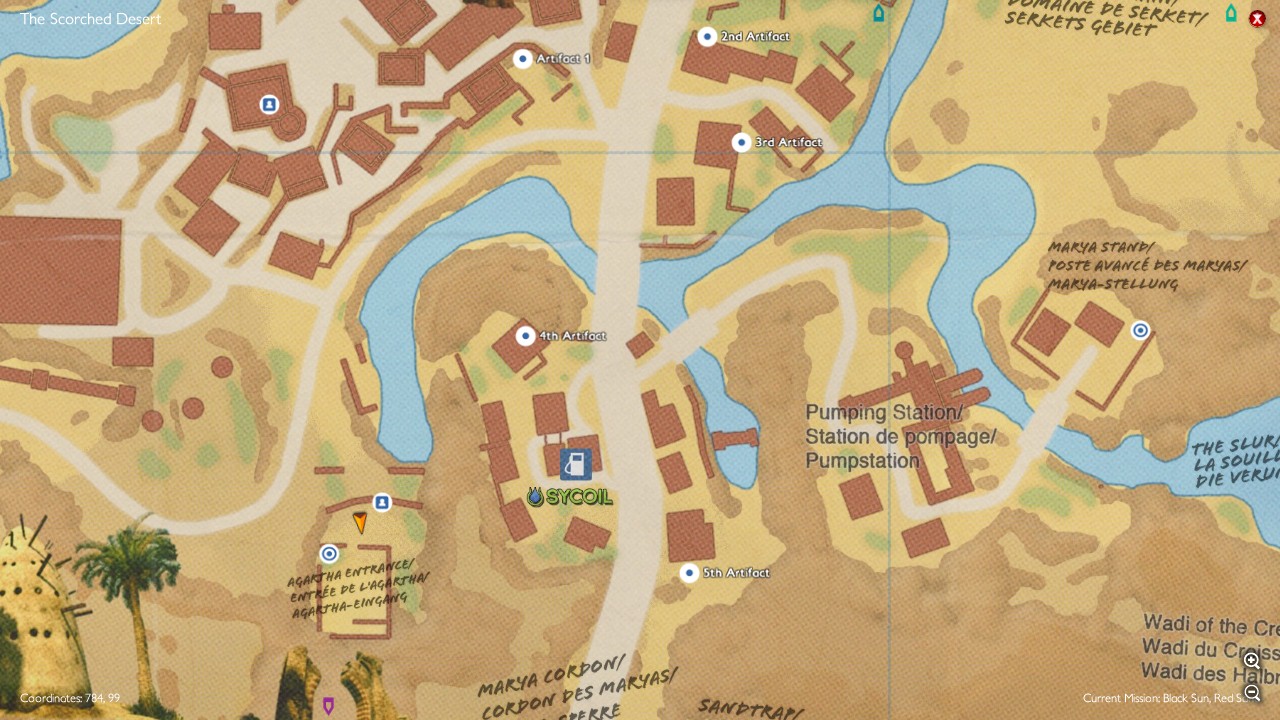
Time to find the Artifacts. Use the tracker near each location.
I am attaching a map with all the artifact locations.
Tier 1-4:
The first one will knock you back if you're in line of sight. So make your way to the burlap wall and click on it through the wall.
The 2nd Artifact has an AOE. Time the bursts and get in quick.
The 3rd slows. It also usually has 4 guards. Grab it.
The fourth is bursting white and purple lights. Grab it.
Tier 5: The last artifact. Grab it and the Herald appears. Start attcking him. He's going to try to run off with the artifact. Stun, slow, and kill him. Then book it to the meeting spot on the map. Get there before your courier leaves. That means sprinting through a few mobs. A courier of your faction will be there waiting for the artifacts. Click him/her. Mission complete. Kudos!
July 30, 2012
The Secret World (TSW) Egypt: Angels & Demons (Investigation)
Tier 1: Go to the highlighted area and find the sign. Hint it's right around the corner and takes up a wall. Inspect it. Then, find the office. Surprise...it's locked.
Tier 2: Ok I am just going to mark where to climb on the map. Climb and jump on the yellow/green burlap. Then jump onto the building. Cross the many buildings via the roof to the building highlighted. Then, find the open door and enter. Inspect the body. Go down stairs and use the computer. Password: 305))
Tier 3: Go to the warehouse and look for a box against the wall for the surveillance video. The clue is to figure out the crate password by sound. Password: 2435
The Secret World (TSW) Egypt: Signal Effect
This quest is marked as a green. But, it is an investigation and it is annoying. I hope this helps.
The 1stDish: You have to climb the ladder indicated on the map to get to this. Some jumping is involved.
The 3rd Dish: You need to return to Zhara and climb the wall NE of them to get to the building roofs. Can't miss the wall there are 2 glowing orbs against it.
With the map you can find the dishes. Each dish uses the same code 12.4 31.7
After you get all the dishes go to The Way of Offerings. Enter the building and locate the transmitter. Inspect it and enter code 6744. Kudos. Lots of annoying jumping but nice XP.
July 29, 2012
The Secret World (TSW) Blue Mountain: The Orochi Group (Sabotage)
After accepting the quest, go to the location marked on your map. Approach the highlighted area.. Jump on top of the vans and jump over the fence into the compound. Avoid the drones and guards.
Locate a canister of Hydrogen Sulfide. They're scattered through out the camp. I located one near a mass of crates. When you have a canister go to the west side of the giant building in the back and jump on top of the AC unit. Yup, we're going to poison them so they evacuate the building. >:D
Enter the building from the north entrance. Careful...poison in the air >:D Find the cage and click it. Optional: Then locate a PDA nearby for a computer password (Henry5621). You don't need the PDA you can just enter the password at the terminal. Now you need to transmit the data. Leave the building. The air is poisonous after all. Make your way to the Northern corner of the map. There are 2 vehicles. A woman is inside the van with the satellite. You need to set off the other vehicle's car alarm to get her out, then get in the van. Click the terminal screen to upload.
Cheers!
The Secret World (TSW) Blue Mountains: Off the Menu
Tier 1/2 (Bonecracker): Inspect the notes on the nearby table. The sedatives are in the store on a shelf next to the Apothecary. Grab a bottle. Go to the location on the map and kill an Akab for meat. Take the meat to the new location and place it where the area is highlighted. Kill the free loaders. Climb on top of the critter's home and wait for him to appear and consume the meat. A bar over him will indicate when it's been consumed. Then, kill him.
Tier 3 (Bloodfangs):Go to the lair on the map. Use the pike near the lair to open a vein to lure the critter and kill it.
Tier 4 (Silent Trickster): Go to the location on your map. So he's a trickster for a reasons. Inspecting the wendigo body at his hovel will reveal it's a trap. Careful...he stuns too. Kill him.
Tier 5 (Elder Warcry): Go to the location on the map. I recommend taking the roads. Click the pikes outside it's lair to start a fight and kill it.
The Secret World (TSW) Egypt: The Traitor (Sabotage)
Tier 1: Go to the location indicated on the map. The building is on lockdown and you need to get in. There is a ladder on it's right side. Climb. Click the switch, and sprint down to the 1st floor to the next switch. Activate the switch. The switch turns off cameras for 30 seconds. Grab the polaroid off a table and leave the way you entered..
Tier 2: Go to the drop off point. The next location is also highlighted. It's the locked building with 2 mules out front. Go behind the building until you see a set of crumbled wall on your left (across from a well and 2 villagers under an umbrella). Climb. Cross the roof to the stairs and descend. There is a door with laser beams. If you go around the side you can click it's switch through the window. Your goal is the computer down stairs. Watch the laser beams and access the computer for option 4. Avoid the light at the bottom of the stairs. If you sprint through the left one from the rear there is a blind spot. If you get caught get near the computer out of the light and wait for the 3 guards to appear. Take care of them, get the info. you came for and leave through the front door.
Tier 3: There is a building NE of the target it has a dome like mini tower near it. On the roof is a dead sniper and a rifle. Use the ladder on the side of the building to climb up and then click the rifle to snipe the target. Afterwards...flee. Case closed.
Note: I chose the easiest way to off the target. The harder way requires climbing, killing guards, cutting cables. I'm too lazy for that.
Posting ladder location for anyone else that chooses this route.
July 28, 2012
Dawning of an Endless Night Tier 10/11
1. Enter the building. Gather the artifacts from the 1st and 2nd floor. The "secret" entrance is in open office at the end of the hall on the first floor. Click on the floor. Now you need the code to get in: 1)Star of David 2)Masonic symbol 3)The Eye 4)Skull 5)Templar cross
2. You don't have to kill anything at all. You can even avoid the mini bosses. I'm pretty much just going to attach a map with the necessary path. The exit requires you to light up the four marks on the ground. Everyone says there is a specific way but I stepped on only two marks and triggered it accidentally. I'll leave that one for you. The rest is cake. BTW I am by no means an artist. Hint: The green line is your route. The blue is the carpet.
July 15, 2012
Welcome to The Secret World
Anyone else tired of those damn YouTube videos that take 40 minutes to get to the point? I have great news! I am too. I am all about getting to the point so you can move on. Yes some of us play for the research missions. By some of us...I mean other people. If, you are one of those "other people" please leave. I enjoy the game. I love the story. I will not spend three hours googling bible verses, obscure phrases, etc. Game on!
Subscribe to:
Posts (Atom)